Tuesday 27 November 2012

Princess Serenity - Inspiration

This past Halloween, I did my usual shopping. I never buy finished costumes, for obvious reasons... but certain accessories are just better to purchase. I always hit up the Halloween stores, as well as the dollar stores, box stores, drug stores, grocery stores... every store! in search of any little items that I might need for existing or future costumes.


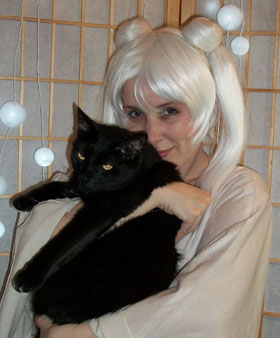
I was in Value Village looking for another foam head, as I had purchased one from there last year. I didn't find the foam head, but I did find a Sailor Moon wig! Tee hee!! If I had found this a few months ago, I might have considered doing a Steampunk Sailor Moon instead of Sailor Mars. Oh well. It is nice to have one of the other characters. I think everyone does Sailor Moon.

I snatched up the wig, happy to have found one that I didn't have to order from ebay. I am still reluctant to order things online, even though it has become easier and safer in the last few years. It still makes me nervous. This is a cheap wig, and the odango need some fixing, but it gives me a starting point, for sure.

Queen Serenity Cosplay Wig
I would love to have one this colour, in keeping with the manga version. 
I actually just stumbled onto this woman's website where she sells these wigs.
So far, I am pleased with what I see.... I may end up buying one from her....

Having a usable wig is inspiring me to start work on a Princess Serenity costume. I have wanted to make one for almost as long as I have wanted to make the senshi outfit. Since picking up the wig, I have been keeping an eye out for anything I could use for Serenity. Pearls are going to be a biggie. Also, anything with moons on them, of course. The wig is yellow, even though I would have preferred the white/silver one I have seen online. Authenticity would dictate that I go with gold accessories to go with the anime version, but I really dislike yellow/gold. I also feel that I have had my fill of gold/copper/brass metals with my Steampunk Sailor Mars. I think I will aim to have this one completed for spring, and the start of the convention season next year, and to coincide with the release of the new Sailor Moon next summer.

Princess (Approx. 13-16 years) and Neo-Queen Serentiy (mid-twenties?)

So, for now, I am doing my research into the different variations of Princess Serenity. I thought of doing Neo-Queen Serenity, because of the more mature look to her (and the fact that she would be closer to my age than the teen princess). But, I don't really like the crown, and the mermaid style of the dress would be too constrictive for my taste, not to mention the length would result in a very dirty hem, and would likely be stepped on and possibly torn. I think I will go with the just-to-the-floor length of the princess' dress...

Manga: Seems to attach to the dress. Anime: Floats on her shoulder.

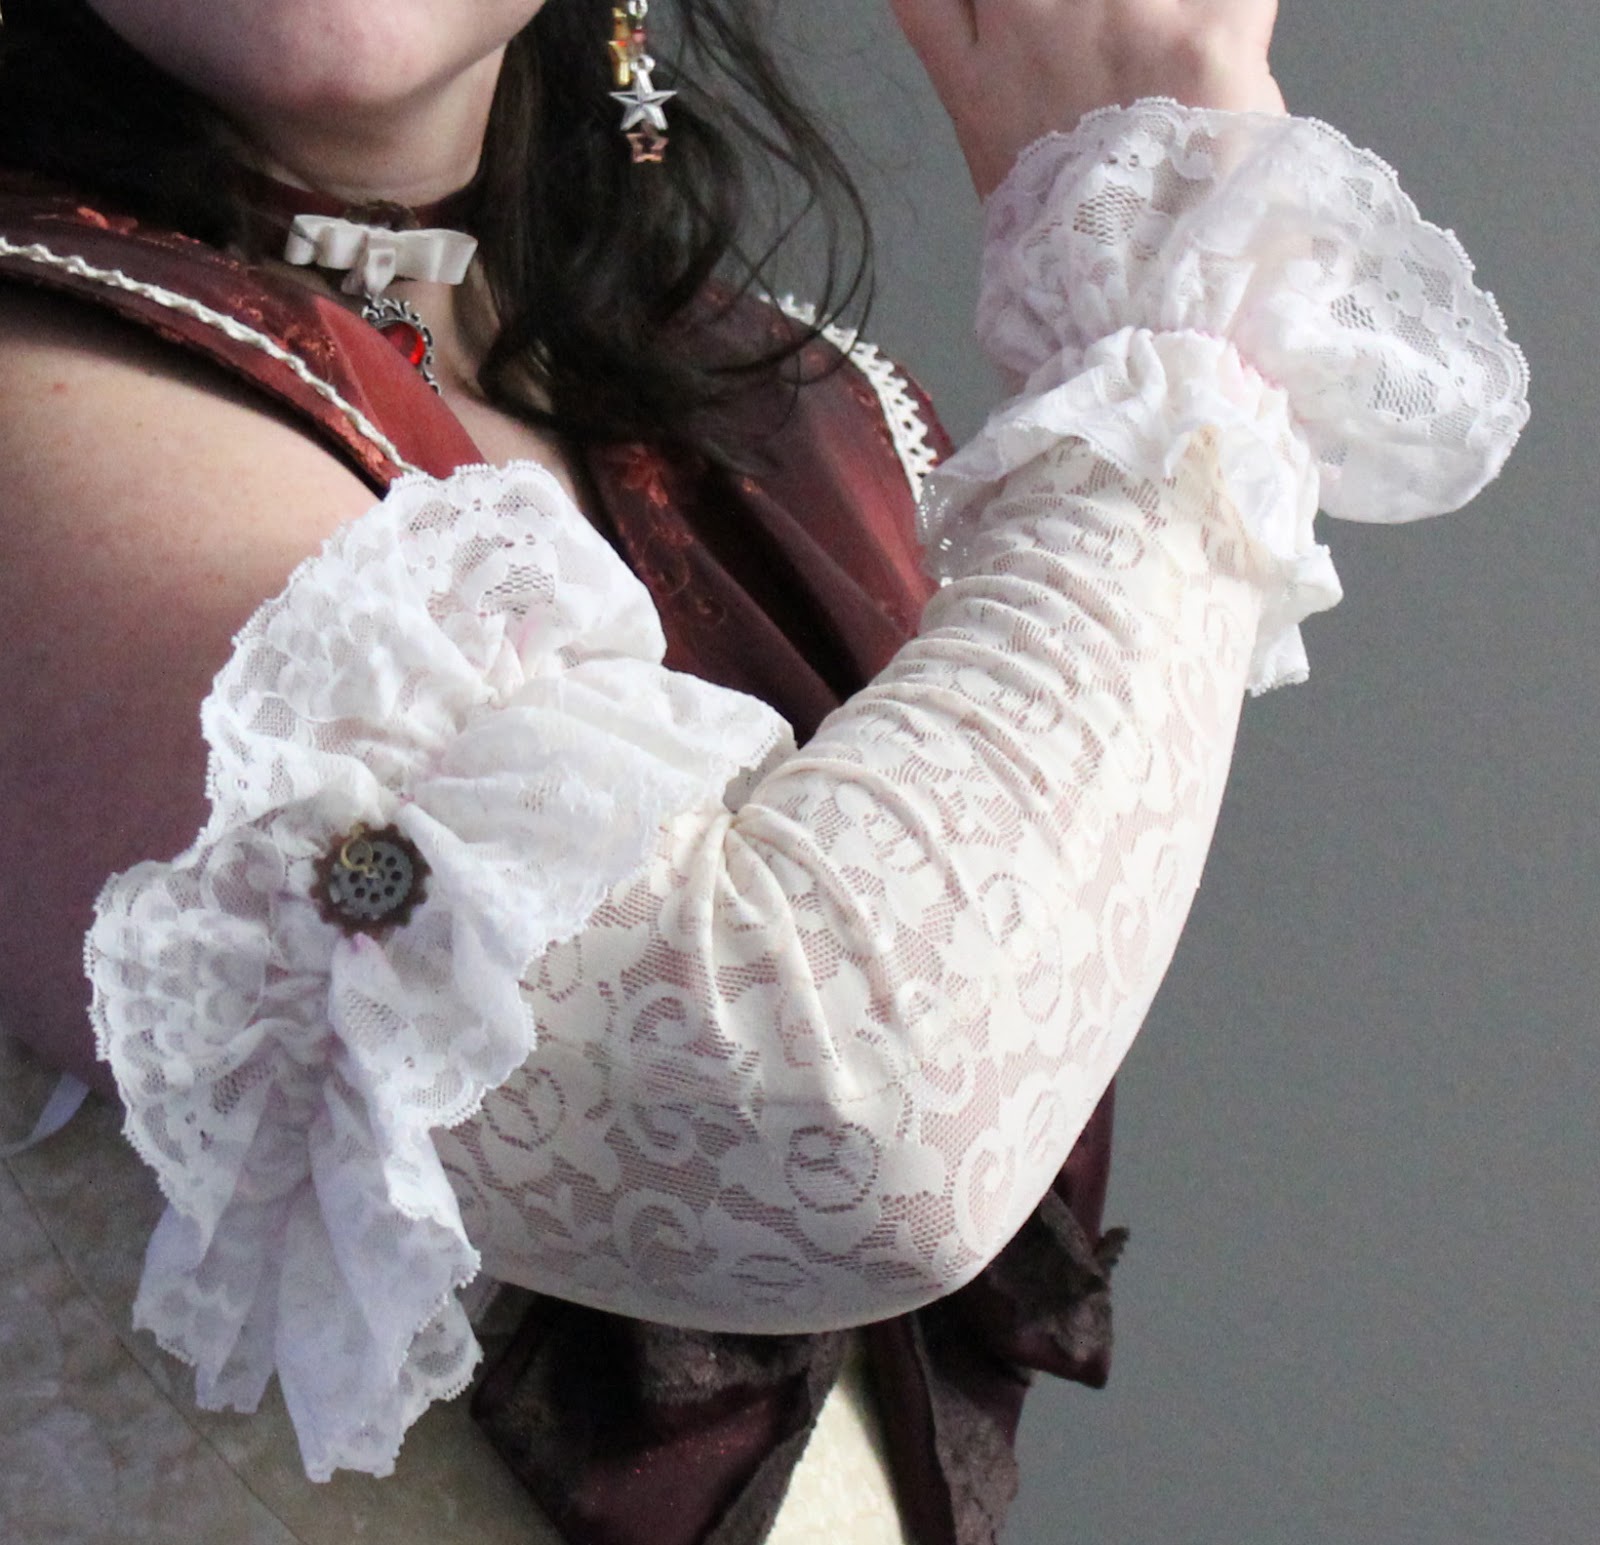
One of the more difficult parts of the princess dress is the shoulders. Depending on the artwork, they are sometimes drawn as being attached to the dress, other times they are floating on the shoulders with no apparent means of attachment. I prefer attaching it to the dress so it stays in place. I saw several different ways that others had managed the "floating" sleeves, including using clear elastic, and I just didn't like it. I plan to do a poofy off the shoulder sleeve, with the front and back "swirls" attached over top. This means that the sleeves are in fact soft, not a hard shell that would be difficult to move in, and they could easily be attached to the dress itself. The manga version seems to have these attached sleeves, and I prefer the level of detail in the manga over the simplified anime version.


In keeping with the manga level of detail, I will have a lot of embellishments. With the heavy beading and trim on the bodice of this dress, but still wanting to keep it strapless, I will need a sturdy framework to support the weight. Boning inside the dress itself will keep things upright, but having a corset underneath it all will keep it where it should be. Once I finish the corset I am currently working on, I will make another one in white or flesh colour to wear under lighter coloured clothing. That will go well under the white dress of this costume, and provide the "scaffolding" so it stays where it should!

I am getting excited about this project! Eeee!!!! Ok, Christmas first, then cosplay!

Tuesday 20 November 2012

Pure Speculation 2012

Another year, another Pure Speculation Festival gone by. I don't know exactly how many years ago I attended my first Pure Spec event, but it was back in the days when it was tiny and held in a community hall near Argyll. I volunteered there for a few years, and then decided to attend as a paying patron. I have been going every year ever since. 

I love the community feel of this festival. I have been to conventions of the small and medium variety (I have not yet travelled to San Diego, Vancouver, or Toronto for the huge conventions), and I must say that the small cons are great! Rather than being in a huge room with five hundred other people, straining to see the slide show at the front of the room, you are in a small room, with perhaps a dozen or so fans, engaging in conversation with the guest. Everyone gets a chance to ask a question, or comment. You get face time with the guests. It really is refreshing. The guest list might not include names like William Shatner or Stan Lee, but they do bring industry insiders... authors, prop designers, comic artists, real people who do these things for a living, and can give you a peek inside their world. 

This year we didn't see as many cosplayers... which made me sad. I love costumes, and I love seeing other people's costumes. I get a bit shy in public, and don't often compliment others on their work, but I do see it and admire it. 

Of those who did dress up, there were a handful of us who participated in the costume contest. Steampunk, being very popular these last couple of years, was well represented! I was the only entry in the advanced category (where, oh where did the other artisans go?) The winner of the novice category was a Steampunk lady (I think her name was Amber, if I remember correctly). She had made her corset, and it was very nicely finished. There was one award for Judges discretion, that was given to a man for his clever "Steam assisted stake" for slaying of vampires and other such creatures of the night. There was also a "random assassin" from the game Assassin's Creed, and a Diesel Punk soldier. The trophies were in keeping with the zombie theme and were 'risen from the dead'. Mine had a sticker on the plate to reflect that it is now a costume trophy, a Pure Spec sticker on the pillar, and topped off with a Green Lantern figure. We fist bumped. One of the other trophies was topped with a pirate ship. Awesomness all 'round.

Fist Bumpin' mah Trophy

My camera, being big and heavy to carry all day, and being horribly out of character, was left at home for the day. It did not occur to me to take photos with my phone (duh!!) so I do not have photos of the other costumes... perhaps, if they are posted at www.purespec.org at some point, I can point people there.

I also picked up a pair of earrings from Weregeek that I had been eyeing for a few years.

Feel the power of the dice!

I do check to see how many people are actually visiting my pages here, and while there has been an increase of visitors, it is impossible to tell if people are coming here because they are interested in what I am posting, or if they came here by mistake and promptly left because this wasn't what they were looking for. Imagine my surprise to be recognised on Sunday, not once, but twice! And both people said "I read your blog". They read it! I am so accustomed to being the fan girl, not being the one with fans! So, here is a "shout out" to my two readers!! And Melissa, I have greatly admired your work for a long time, and to hear your praise for my own skills meant a great deal to me!

It was great running into friends at the various tables! Many great conversations were had, and I look forward to seeing you all again at the next con, though it is so far away...

Well, with the conventions all wrapped up for the year, I will get back to my non-costume sewing and other projects. I am still undecided on the next step for my corset... 

Friday 16 November 2012

Corset Design, Drafting, Construction Pt 3

My corset supplies arrived at the end of the summer, but with a couple other projects queued up before, I am now finally getting to the corset! I ordered a busk, spring steel bones (the flat ones, to put next to the laces for extra stability), and a coil of spiral steel and tips so I can cut the lengths myself. I also ordered a metre each of black and white herringbone coutil (the sturdy material for my strength layer, this is fabric specially designed for corset making and has no stretch). For my first one, I think I will make it with the black coutil, but I still  have time to make the final decision on the colour I plan to use for this first corset.

I want to state first of all, many of the tips and tricks I learned are thanks to Lucy and her wonderful Youtube videos on how to make corsets. Her instructions are excellent, and I do not wish to rehash them here. I will share my experience with following her instructions, as well as any other sources I my have found along the way. Where I have something to add to what is already existing, I will. So, the following will skip over some of the specific details in the actual construction:

First, I want to make a mock up. I keep my fabric in boxes sorted by colour, as that is usually how I determine what I am going to use. There are fabrics that I have that I would never use for a wearable garment, so I keep those in a separate box, regardless of colour. That is my "scrap bin". I will use these materials for linings, under garments (like petticoats), and mock ups. I found a light blue cotton with very little stretch (almost any fabric you find will have some small amount of give to it, even if it isn't "stretch" fabric). This will do for the mock up.

This is the line traced from the pattern piece. Seam allowance must be ADDED to these, as these lines will become my guides for sewing the pieces together. The idea is to sew exactly along the lines.

I cut out my pattern pieces. These are cut right to the actual dimensions of the final piece, and I have to add the seam allowances to them when I trace them out on the fabric. This is because I want to be able to trace the actual size, so I know EXACTLY where my sewing lines will be. Corset making is a very precise craft, and as Lucy says, 1-2mm added to each side of each piece, on a pattern with so many pieces, can add almost an inch to the total waist measurement!

You can see where the waist line is. I used that to line up the pieces when sewing them together, so I knew the waist would match up all the way around. I can always trim the top and bottom to create a smooth line later.

Important little tip - Something I learned many years ago: I number all my pieces and put an arrow pointing to the top of the corset. This makes sewing them together much easier. Once they are all cut out, it is hard to tell which piece goes where, and what direction they should go in. I have sewn a piece in upside down before, and it was a huge pain to take it out and put it back in. I also kept my left and right sides in separate piles so I didn't mix up my panels.

I did put a waist tape in the mock up. The fabric I am using is really cheap, flimsy, and has some stretch, and a waist tape would help keep the waist line as accurate as possible.

Once the pieces were sewn together, I had to make the boning channels. I just tacked down the seam allowance for this purpose. I used plastic boning I had left over from other projects. I won't cut my spirals until I know exactly what sizes I will need, and this is mock up so it doesn't need to be pretty!

With the left and right halves of the corset done, I can start doing the laces. I don't plan on using this for wearing, so I am not at all concerned about the grommets. And, at this point, I am feeling kinda lazy! So, I am using my punch, and I will just punch the holes out! No grommets! Lets see how well this works.... with the bones sandwiching the laces, I am hoping that they don't tear when I lace this up. I marked them 1" apart and used my punch to make all the holes. This was slow going, because the fabric is kind of flimsy, but much faster than hammering grommets!


I can now lay my corset out, lacing panels together, and start inserting my laces. For a great videos on different ways to lace your corsets, check out the videos on this Youtube Channel.

With the laces in place, I can now try on my mock up for the first time!

The shape I am going for is a little more dramatic that the gentle hourglass shape. This is because I want to have it as comfortable as possible in my ribs and hips. I have broad hips, and those won't move, no matter how small I make the corset. I also don't want much compression on my ribs, so I have designed the corset shape so it is snug around my ribs, with little reduction there. I will see how that feels.

The shape I am getting is

The top half of the corset has the peak in the front,  and comes up higher in the back. The bottom of the corset comes down right over my hips, and low over my lap. I did do a sit test to make sure that this was not going to dig into my legs! You can see it nips in at the waist, but otherwise follows the natural shape of my body to maximise comfort.
A side note, Pixel, my cat, decided to make a guest appearance.

There were a few things I wanted to change. I found it to be a little loose in the front over my tummy, and I wanted to change up the curve in the waist a little. I traced my pattern pieces onto a sheet of card, altered the lines where I felt was necessary (The original pieces are left un-altered, in case these changes don't do what I intended), and made another mockup.

I see more changes that I would like to make, but I think I have the overall shape down. 
The top back is a little loose and the gap isn't even all the way down.

So, overall, I am quite happy with the results. With the minor adjustment to the width of the back, I think I am ready to start cutting the actual materials for the final corset! I am still working up the guts to do it... the rational part of my brain tells me, "It is just fabric, you can buy more. Get over it." The perfectionist in my brain says, "One more mock up. No, just one more. Ok, just one more." Perfectionist, if I let you take over, I will NEVER have my corset finished! 

Please excuse me while I give myself a pep talk, and hopefully I will have a completed corset to share in a couple of weeks!

Tuesday 30 October 2012

Genre Mash-Up: Steampunk Sailor Mars - Pt 7 Complete!


The costume is done and has made its debut! The Edmonton Comic and Entertainment Expo also had its debut, and both were well received. With ticket sales capped, the ECEE was saved from the same mistake its Calgary counterpart suffered in April. No lockouts, no Fire Marshals, and everyone had a great time. I plan on returning next year with pre-purchased tickets, to avoid having to show up at 7am to get day passes! Yes, I did that, after hearing on Friday that tickets almost sold out during pre-sale. But I was second in line to buy my day pass, and was home by 9am to nap and get dressed!

My worries that my costume would not be recognized for what it was were totally baseless. At the very least, those who approached me knew what TV show my costume was from. A common question was "Are you Sailor Moon?" to which I simply responded, yes. But, many did actually ask "Are you Sailor Mars?" or simply exclaimed "Its Sailor Mars!" So, I would count this as a total success!

From the previous posts, it is likely fairly clear that there are many layers to this outfit. Let me show you just how many!


First, there are the base undergarments, that I will not show... I do want this blog to be family friendly! (That explains the blue towel, right?) Second, the base corset or bodice, this is the one with the million and a half pieces of boning that I made for my pirate costume.


Over this, I layer my skirts. First, the petticoat for body.


Then, the red skirt, where I have stitched a ribbon and a large button (Not visible in this photo, oops!). My little purse hangs from the ribbon, and is secured up and out of the way by the button. This way, my purse is not visible to everyone, and I am not carrying a purse or wallet that is out of character.


Next is the brown over skirt. This one has a ribbon that ties up a section of it so the red skirt is visible underneath.


The lighter bodice goes over all of this. This bodice is lacking the tabs at the bottom, so the under one is longer and helps support the weight of all the skirts. This over-bodice is lighter, has less boning, and is mostly for visual purposes.


Next, the shoulder piece. I ended up sewing the bow right to it, because it was flopping around too much. I might pull it off and attach it with snaps, so that I could change things around to different colours, but for now, this is the only Senshi I am doing, so it is sewn in place. I did put hook and eye fasteners on the bodice and shoulder yoke to keep it from shifting around as I move throughout the day.


The back bow still has pin backs. I need to be able to lace the bodice up, and sewing the bow directly to the bodice doesn't work for that. I did need help pinning the back bow to the bodice, and my husband was kind enough to do this for me! And to remove it later, because taking it off really wasn't much easier that pinning it on in the first place!


The gloves didn't like to stay in place, so I tied them to the underarm of the bodice. This kept them more or less in place throughout the day, though I was still tugging them up every now and again... I will be adjusting those to fit a little more snugly around my upper arm so they stay in place better.


The cap "topped" it off nicely (Ha ha?). Finish with earrings, bracelet, choker, boots... It was quite the ordeal just getting dressed!


So, those are the many layers of the costume. When doing anything that is historical, or at least inspired by historical costumes, there are going to be many many layers. I think this concludes my Steampunk Sailor Mars adventure. Onto the next project!

Monday 22 October 2012

Genre Mash-Up: Steampunk Sailor Mars - Pt 6

The Sailor Senshi all wear a tiara with a coloured jewel in the middle of their forehead. I really didn't want to wear the gold band across my forehead, so I opted to make a hat instead. My goal was to make a cap, shaped to my head, with the front edge mimicking the shape of the tiara. It turned out quite well! Probably the best hat I have made yet!


I tried cutting a flat piece, but that resulted in a very flat cap that stuck out on either side of my head....kinda looked like wings! Not what I was going for. After a few failed attempts at "winging it" to get the shape I was looking for, I pulled out a foam head, pins and thread to join my paper and pencil. 

I measured on my own head the total length that I wanted. I then measured this and marked it with pins on the front and back centres of the foam head. I put another pin in the top middle, and tied a piece of thread joining the three points. I measured how far I wanted the hat to come down above my ear, and placed a pin in that point as well. I marked out the general shape I wanted using pins on the foam head, and joined them up with thread. I then started dividing this up. I wanted to create a series of flat shapes that would form a curve when stitched together. I placed pins within the general shape, and joined them together with thread also.


Once I had the little pieces marked out, I carefully traced them onto the piece of paper, following the thread lines. These were now my pattern pieces.


I traced these onto a nice patterned felt, flipping them over to get both a left and right side for the hat. I then cut them out, and started carefully stitching them together. Once all the pieces were sewn, I put a line of glue down each seam, on the inside of the hat, to help reinforce the seams. The stitches are mostly holding onto the fuzzy soft side of the felt, to avoid too many stitches showing on the outside, and this doesn't hold very well. The risk of a stitch popping out was a little too high for my liking. The glue helped.


With all the pieces sewn and glued in place, I stitched a lighter piece of lace around the outer edge. This was going to be my faux tiara.


I hung a chain and a Mars symbol from the bottom of the jewel, and stitched that into place. Last minute, I decided to add a gear behind it, to help add a little more Steampunk flavour to it. Yes, I added a completely erroneous gear to make it more Steampunk... But, it does look cool.


I found a set of gold bobby pins with little amber jewels in it, and used that to pin the hat to my hair. I think that, even though they are far more visible, they look a thousand times better than plain black bobby pins! 

With the rest of the outfit, it was a nice final touch!

Genre Mash-Up: Steampunk Sailor Mars - Pt 5

As mentioned in Part 3, the finished skirt was a little limp and lifeless... and anime skirts are almost always full bodied and full of movement. This skirt requires a petticoat.

After looking at many petticoat tutorials, I became frustrated with the amount of math required.... I hate math! So, I decided to wing it. Again.

I measured the total length of the finished red pleated skirt. I cut a piece of lining that is the same length. I used the full width of the material, and will gather the waist and finish with a drawstring. This will allow me to adjust the waist to fit whatever corset I might be wearing with it. I stitched up one side and hemmed the skirt, so what I am left with is a hemmed tube.


I cut two pieces the full width, and half as long. (My lining is about 30" long, so this layer is about 15" long). I stitched the sides of these two pieces together so I have a tube that is now half as long and twice as wide as the lining. Hem this also, because it is much easier to hem before all the tulle is added. Next, I cut a piece of tulle that is the same size as this layer. This, I stitched flat to the top edge. Because this will be gathered, I didn't bother gathering the tulle before sewing it to this layer.


Next, cut strips of tulle. I cut them to 12", the full width of the material. I now have a nice stack of 12" x max width of tulle. I took each piece to the sewing machine, and with my longest stitch available, ran a straight stitch up the centre of all the pieces. So, if you look at the strip, there is a long stitch line the entire length of it, dividing my 12" strip into two 6" sections.


Once all the pieces of tulle have their line down the middle, I pulled one of the threads to gather the pieces. I now have a pile of slightly gathered tulle strips.


Laying my lining flat, I pinned the gathered pieces of tulle along their stitch line. The plan is to have the edge of the tulle hanging over the edge of the lining by about 1-2". This will hide the lining and allow for the ruffled edges of tulle to stick out slightly from under the skirt.


I repeat for the shorter layer. Once the gathered pieces of tulle are pinned securely to the lining pieces, I stitched them down over the long gathered stitch I had earlier. This will leave you with a ruffle sticking out up and down. Fold down the top half so it hangs down over the edge of the lining with it's bottom ruffle, and there you go! Two layers of gathered tulle, and you only had to do it all once! I hate working with tulle, and this just saved me the trouble of having to go through the gathering and stitching once! Yay!


Once all the tulle is stitched to the lining pieces, it is time to put it all together. I ran another long stitch along the top of the short piece, where the single layer of tulle is, and pulled the thread to gather, like I did will all that tulle. Once I had it gathered to fit around the inner lining, I stitched it in place. Once the waist band is pulled tight, the layers of gathered lining and tulle puff out nicely!

This is what it looked like putting all the layers together! Quite the mess!

It gives the overskirts the much needed volume! It was a huge relief, because with the convention only two sleep away, I was starting to enter panic mode!

Much better with added volume!

Genre Mash-Up: Steampunk Sailor Mars - Pt 4

Props. These can be big, small, simple, elaborate... They can be incredibly descriptive for the character, like a trademark sword, or can be a fun little detail.

I had decided that Sailor Mars needed a prop. A few ideas came to mind... I would love to have made all of them, but time will only allow for so many.

I wanted to make a fiery crossbow, rather than the full scale flaming bow and arrow. Non-functional, of course... most conventions stipulate that all prop weapons must be made of safe materials, and cannot be functional. This crossbow would be made from various pieces of wood, and would be permanently in the drawn position and glued into place, never to fire its arrow. I didn't have time for a crossbow. Sorry if this is a disappointment... it was for me too, and perhaps one day, I will make it. There are just so many logistical issues with it, and I don't even know where to start.

I figured I would go for something simple... something easy to make Marsy and Steampunky. How about the  Transformation wand? With several variations of that throughout the series, it shouldn't be too difficult to make one that at least resembles on of them. My personal favourite was the star version. I just think the star that repeats on Sailor Mars' outfit is great, and having several stars on it already, this seemed like a natural choice.


I trolled the aisles of my local craft and sewing stores for the pieces I would use. With Christmas coming up, I was able to find a felt star that had a nice filigree pattern cut into it. Glue this to a stable layer (a wooden star, in this case), paint it gold, and I have a nice Victorian version of the topper on the star wand.


I found a nice wooden something or other in the woodworking section of Michaels Crafts. I squashed a piece of Fimo (polymer clay that hardens when baked) to fit between the star and the handle.


I painted them as separate pieces, and glued them together when they were dry. I didn't like they way the red and gold Fimo piece stood out, so I painted that gold after I assembled everything. It looked much better once it was painted gold too!


I glued some gears to it, and wrapped a chain around the handle. It looked quite nice when it was done. I will include some better photos in my summary at the end of the project.

Final note on props... in addition to the rules of the convention about weapons and props, remember that you are going to have to carry this thing around ALL DAY! Being a totally non-functional prop, not a purse or something else that was actually useful, I found it annoying to carry this around for 6 hours. And it wasn't even that heavy. I am having second thoughts now about taking this prop to my next convention, and instead I am thinking about making a different accessory that is hands free.

Genre Mash-Up: Steampunk Sailor Mars - Pt 3

Overskirt and Underskirt

The overskirt is from Butterick pattern B3906 - Misses Petite Costume (really descriptive name!). Basically, it was for a generic barmaid/housemaid/peasantwoman outfit. The type of fabric used would determine the theme of the costume. I had made it with a brown pinstriped material with an ivory cotton lace trim and a brown ribbon tie, as seen in the pirate photo in the previous post. For Sailor Mars, I will be swapping out the ivory cotton shift for a red taffeta pleated underskirt. The red taffeta will be the same material used in the sailor collar.
B3906


I didn't bother buying a pattern for the underskirt. I am basically going to make a shorter version of the black skirt I had made for the Victorian Dress I made earlier in June. I gather the top to a waistband, and make lots of pleats which are sewn to the bottom of the skirt.

I did go back and forth with how to do the bottom of the dress. I could do a gathers, or I could do knife pleats. Looking at Sailor Mar's original skirt, I decided to go with the pleats, even though they will take much longer. The Victorian skirt took 6 hours just to do the pleats. But, having done them once before, it went much faster this time! And, I don't think the skirt is as full, so there were fewer pleats to make.

With the pleats stitched to the bottom, I gathered the top and sewed that inside a simple waistband. I am not sure if I will use hooks or ties to close it. I am thinking about using ties, because I may need to adjust the size depending on the corset I might be wearing with it.


It is lacking in volume, and as anyone who has watched any anime knows, their skirts are never limp and lifeless! I don't want to go full out Lolita, but a petticoat will finish this off nicely.

Genre Mash-Up: Steampunk Sailor Mars - Pt 2

A couple of years ago, I made a pirate costume. I had every intention of using most of that costume in a Steampunk outfit. The over skirt and the bodice are the big ones. The pirate hat doesn't really transfer that well!
My stagette was pirate themed, so that is my explanation for the crown on top of my hat!

In my design for Steampunk Sailor Mars, I kept those two items in mind. 

The bodice was a lot of work, and the boning took forever. I used Butterick pattern B4254 - Misses Stays and Corset - View A.
B4254


Each boning channel must be sewn in a specific order, and each bone must be inserted before the next channel is sewn. This is because they go in all sorts of directions, and the next bone will close off the previous channel. I drew on the lining side with a marker each stitch line, traced from the pattern. Following the instructions, I wrote the number on each channel, so I would know which ones to sew first. After each channel, I inserted the bone, and moved on to the next one. Because of the high number of bones, and the fact that this was a costume piece, I used plastic boning from the fabric store. Each bone is sandwiched between the fashion layer and lining. There are two layers of material in the corset. The edges are finished with bias binding, hand stitched all the way around. The grommets are two piece, hand set. The lacing is 1/2" ribbon.

Because the original stays took so long, and involved so much boning, my plan was to make "covers" to wear over the original when I wanted to change the colour. This meant that I could sew the basic stays, put a few key pieces of boning in place (the very front and next to the laces) and wear it over top of the original piece. The structure and shape would be created by the original heavily boned garment, and the top layer would simply be for fashion. Lots of layers, yes, but much easier to make! This is exactly what I have done for Sailor Mars.


During design stage, I decided that I didn't want to tabs on the bottom of the bodice.  I removed the tabs from the bottom, smoothing out the bottom line. The whole thing is hand stitched with ivory bias tape, and then ivory lace is sewn to the bottom edge. I had lots of ivory lace left from the original pirate skirt, so I used the same lace to edge the bottom of the bodice, tying the whole look together.

When raiding my grommet stash, I discovered that I had no gold coloured grommets. A trip to the notions section of my local Fabricland left me disappointed... in a last desperate attempt, I looked through their clearance section, and found these adorable brassy star grommets!! They did not come with a setting tool, and I was unsure if my various tools at home would do the job. I resigned myself to trying these with my last resort being to use the silver grommets I had in my stash at home. Lucky for me, these worked just fine in the setting tools I had!


What a perfect little detail! It is highly unlikely that ANYONE is going to notice these, but by golly, I know they are there, and I just L-O-V-E that they fit the theme and character so well!

Tuesday 18 September 2012

Genre Mash-Up: Steampunk Sailor Mars


The first anime I ever watched was Astro Boy, but I was far too young to realize what it was. Instead, I am going to go back to the first anime that had an impact on my life. I know that may sound silly, having any tv show, especially a cartoon impact your life in any meaningful way. But, this was in fact the case for me.

As a child, I always did like to draw. In grade six, Sailor Moon (even the horribly dubbed Dic version) was the first time I really sat down and tried to imitate a style with such loyalty. When the network moved the time slot my grandparents taped it for me (this was back in the day of VHS cassettes!) and I would pause the tape so I could draw the scene. I also started collecting the cards so I could draw all the characters without pausing the tape.

I was getting really good at it! By the end of grade nine I knew that I either wanted to pursue science or art. In high school, I took as many art and science classes as I could. My school even offered an animation class that I was fortunate enough to take! By graduation, I knew I wanted to be an animator. I even applied at Sheridan, the school you want to attend in Canada if you want to do animation. It was not to be, and I ended up going to the local college to take graphic design, and that is what i have been doing since. Long story short, I can thank Sailor Moon for the career path I have taken.

Recently, there has been a huge move toward the Steampunk trend in the cosplay world. Go to any convention and you will see someone in Steampunk garb, and at least one vendor selling accessories with gears and brass all over them. I have to admit, I do really like the Steampunk theme. And for a while, I have been tossing around the idea of doing an outfit.

I have long wanted to make a Sailor Moon outfit, but it has been many years since I have had the figure to pull it off. I am a stickler for details and would have this compulsive desire to make the costume as authentic as possible. And the crescent moons should be on the tiara, not under the back of the skirt!

Then I saw an image that had been shared around Facebook. Someone had done a drawing of a steampunk Sailor Moon and Tuxedo Mask! I loved the fact that it was an alternate version, with a longer skirt. I began to look at each of the senshi. I hate wearing wigs, and a good Sailor Moon wig with the odango and pigtails is way more money than I want to spend on a wig! I have dark brown/died black hair that is currently shoulder length. With a bit of pinning up, I could pull off Mercury.

The mercury symbol was proving very difficult to find, and I couldn't find a nice earthy blue in the fabric store. Mars is the male symbol, so that was much easier to find! And rusty earthy reds are everywhere right now, with fall and Christmas coming. So, Mars it is! I will have a partial up-do, to get away with having much shorter hair, and my skirt will cover my bum!