Tuesday 30 October 2012

Genre Mash-Up: Steampunk Sailor Mars - Pt 7 Complete!


The costume is done and has made its debut! The Edmonton Comic and Entertainment Expo also had its debut, and both were well received. With ticket sales capped, the ECEE was saved from the same mistake its Calgary counterpart suffered in April. No lockouts, no Fire Marshals, and everyone had a great time. I plan on returning next year with pre-purchased tickets, to avoid having to show up at 7am to get day passes! Yes, I did that, after hearing on Friday that tickets almost sold out during pre-sale. But I was second in line to buy my day pass, and was home by 9am to nap and get dressed!

My worries that my costume would not be recognized for what it was were totally baseless. At the very least, those who approached me knew what TV show my costume was from. A common question was "Are you Sailor Moon?" to which I simply responded, yes. But, many did actually ask "Are you Sailor Mars?" or simply exclaimed "Its Sailor Mars!" So, I would count this as a total success!

From the previous posts, it is likely fairly clear that there are many layers to this outfit. Let me show you just how many!


First, there are the base undergarments, that I will not show... I do want this blog to be family friendly! (That explains the blue towel, right?) Second, the base corset or bodice, this is the one with the million and a half pieces of boning that I made for my pirate costume.


Over this, I layer my skirts. First, the petticoat for body.


Then, the red skirt, where I have stitched a ribbon and a large button (Not visible in this photo, oops!). My little purse hangs from the ribbon, and is secured up and out of the way by the button. This way, my purse is not visible to everyone, and I am not carrying a purse or wallet that is out of character.


Next is the brown over skirt. This one has a ribbon that ties up a section of it so the red skirt is visible underneath.


The lighter bodice goes over all of this. This bodice is lacking the tabs at the bottom, so the under one is longer and helps support the weight of all the skirts. This over-bodice is lighter, has less boning, and is mostly for visual purposes.


Next, the shoulder piece. I ended up sewing the bow right to it, because it was flopping around too much. I might pull it off and attach it with snaps, so that I could change things around to different colours, but for now, this is the only Senshi I am doing, so it is sewn in place. I did put hook and eye fasteners on the bodice and shoulder yoke to keep it from shifting around as I move throughout the day.


The back bow still has pin backs. I need to be able to lace the bodice up, and sewing the bow directly to the bodice doesn't work for that. I did need help pinning the back bow to the bodice, and my husband was kind enough to do this for me! And to remove it later, because taking it off really wasn't much easier that pinning it on in the first place!


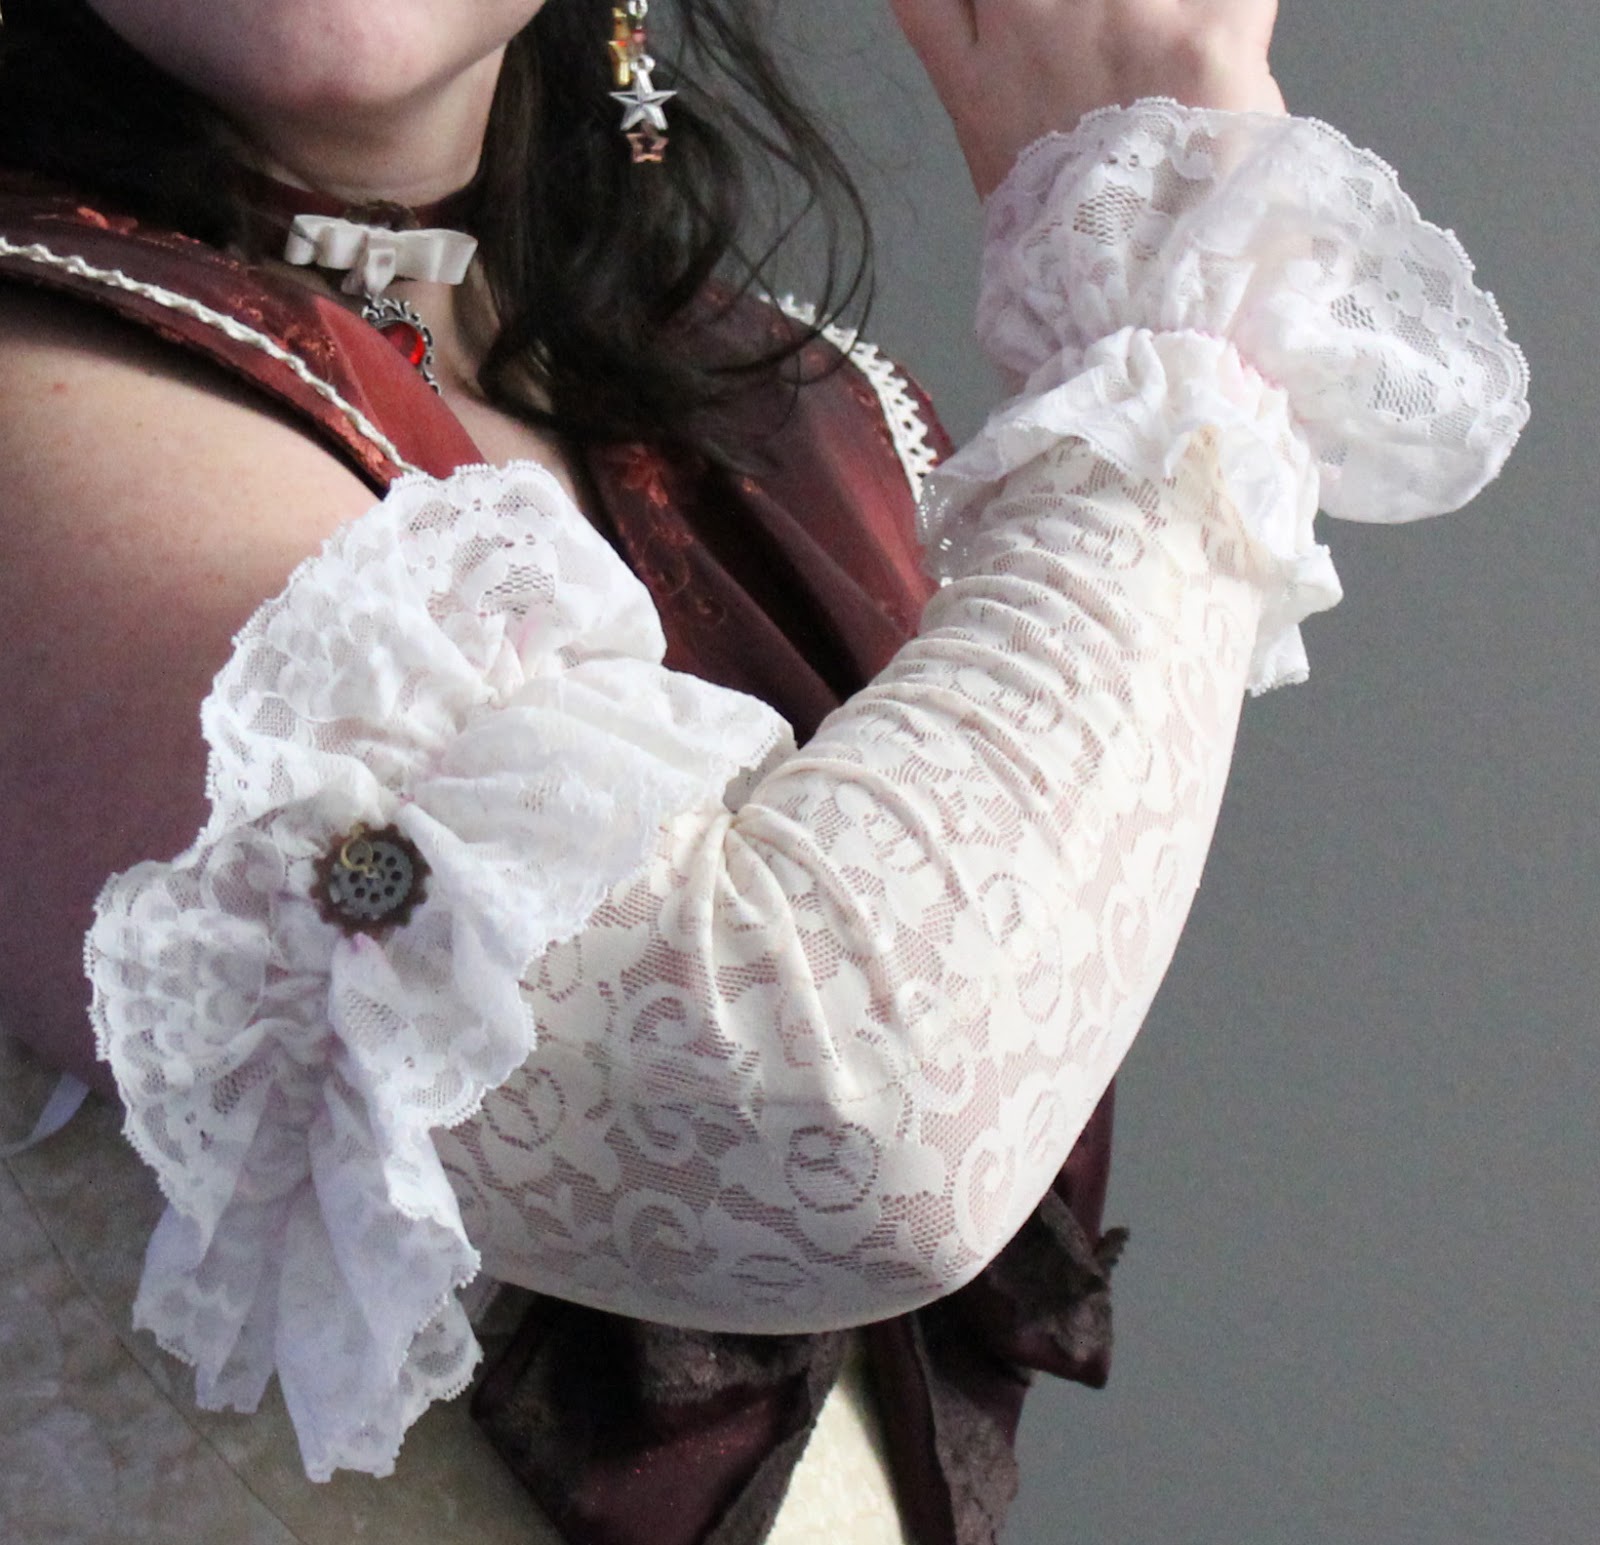
The gloves didn't like to stay in place, so I tied them to the underarm of the bodice. This kept them more or less in place throughout the day, though I was still tugging them up every now and again... I will be adjusting those to fit a little more snugly around my upper arm so they stay in place better.


The cap "topped" it off nicely (Ha ha?). Finish with earrings, bracelet, choker, boots... It was quite the ordeal just getting dressed!


So, those are the many layers of the costume. When doing anything that is historical, or at least inspired by historical costumes, there are going to be many many layers. I think this concludes my Steampunk Sailor Mars adventure. Onto the next project!

Monday 22 October 2012

Genre Mash-Up: Steampunk Sailor Mars - Pt 6

The Sailor Senshi all wear a tiara with a coloured jewel in the middle of their forehead. I really didn't want to wear the gold band across my forehead, so I opted to make a hat instead. My goal was to make a cap, shaped to my head, with the front edge mimicking the shape of the tiara. It turned out quite well! Probably the best hat I have made yet!


I tried cutting a flat piece, but that resulted in a very flat cap that stuck out on either side of my head....kinda looked like wings! Not what I was going for. After a few failed attempts at "winging it" to get the shape I was looking for, I pulled out a foam head, pins and thread to join my paper and pencil. 

I measured on my own head the total length that I wanted. I then measured this and marked it with pins on the front and back centres of the foam head. I put another pin in the top middle, and tied a piece of thread joining the three points. I measured how far I wanted the hat to come down above my ear, and placed a pin in that point as well. I marked out the general shape I wanted using pins on the foam head, and joined them up with thread. I then started dividing this up. I wanted to create a series of flat shapes that would form a curve when stitched together. I placed pins within the general shape, and joined them together with thread also.


Once I had the little pieces marked out, I carefully traced them onto the piece of paper, following the thread lines. These were now my pattern pieces.


I traced these onto a nice patterned felt, flipping them over to get both a left and right side for the hat. I then cut them out, and started carefully stitching them together. Once all the pieces were sewn, I put a line of glue down each seam, on the inside of the hat, to help reinforce the seams. The stitches are mostly holding onto the fuzzy soft side of the felt, to avoid too many stitches showing on the outside, and this doesn't hold very well. The risk of a stitch popping out was a little too high for my liking. The glue helped.


With all the pieces sewn and glued in place, I stitched a lighter piece of lace around the outer edge. This was going to be my faux tiara.


I hung a chain and a Mars symbol from the bottom of the jewel, and stitched that into place. Last minute, I decided to add a gear behind it, to help add a little more Steampunk flavour to it. Yes, I added a completely erroneous gear to make it more Steampunk... But, it does look cool.


I found a set of gold bobby pins with little amber jewels in it, and used that to pin the hat to my hair. I think that, even though they are far more visible, they look a thousand times better than plain black bobby pins! 

With the rest of the outfit, it was a nice final touch!

Genre Mash-Up: Steampunk Sailor Mars - Pt 5

As mentioned in Part 3, the finished skirt was a little limp and lifeless... and anime skirts are almost always full bodied and full of movement. This skirt requires a petticoat.

After looking at many petticoat tutorials, I became frustrated with the amount of math required.... I hate math! So, I decided to wing it. Again.

I measured the total length of the finished red pleated skirt. I cut a piece of lining that is the same length. I used the full width of the material, and will gather the waist and finish with a drawstring. This will allow me to adjust the waist to fit whatever corset I might be wearing with it. I stitched up one side and hemmed the skirt, so what I am left with is a hemmed tube.


I cut two pieces the full width, and half as long. (My lining is about 30" long, so this layer is about 15" long). I stitched the sides of these two pieces together so I have a tube that is now half as long and twice as wide as the lining. Hem this also, because it is much easier to hem before all the tulle is added. Next, I cut a piece of tulle that is the same size as this layer. This, I stitched flat to the top edge. Because this will be gathered, I didn't bother gathering the tulle before sewing it to this layer.


Next, cut strips of tulle. I cut them to 12", the full width of the material. I now have a nice stack of 12" x max width of tulle. I took each piece to the sewing machine, and with my longest stitch available, ran a straight stitch up the centre of all the pieces. So, if you look at the strip, there is a long stitch line the entire length of it, dividing my 12" strip into two 6" sections.


Once all the pieces of tulle have their line down the middle, I pulled one of the threads to gather the pieces. I now have a pile of slightly gathered tulle strips.


Laying my lining flat, I pinned the gathered pieces of tulle along their stitch line. The plan is to have the edge of the tulle hanging over the edge of the lining by about 1-2". This will hide the lining and allow for the ruffled edges of tulle to stick out slightly from under the skirt.


I repeat for the shorter layer. Once the gathered pieces of tulle are pinned securely to the lining pieces, I stitched them down over the long gathered stitch I had earlier. This will leave you with a ruffle sticking out up and down. Fold down the top half so it hangs down over the edge of the lining with it's bottom ruffle, and there you go! Two layers of gathered tulle, and you only had to do it all once! I hate working with tulle, and this just saved me the trouble of having to go through the gathering and stitching once! Yay!


Once all the tulle is stitched to the lining pieces, it is time to put it all together. I ran another long stitch along the top of the short piece, where the single layer of tulle is, and pulled the thread to gather, like I did will all that tulle. Once I had it gathered to fit around the inner lining, I stitched it in place. Once the waist band is pulled tight, the layers of gathered lining and tulle puff out nicely!

This is what it looked like putting all the layers together! Quite the mess!

It gives the overskirts the much needed volume! It was a huge relief, because with the convention only two sleep away, I was starting to enter panic mode!

Much better with added volume!

Genre Mash-Up: Steampunk Sailor Mars - Pt 4

Props. These can be big, small, simple, elaborate... They can be incredibly descriptive for the character, like a trademark sword, or can be a fun little detail.

I had decided that Sailor Mars needed a prop. A few ideas came to mind... I would love to have made all of them, but time will only allow for so many.

I wanted to make a fiery crossbow, rather than the full scale flaming bow and arrow. Non-functional, of course... most conventions stipulate that all prop weapons must be made of safe materials, and cannot be functional. This crossbow would be made from various pieces of wood, and would be permanently in the drawn position and glued into place, never to fire its arrow. I didn't have time for a crossbow. Sorry if this is a disappointment... it was for me too, and perhaps one day, I will make it. There are just so many logistical issues with it, and I don't even know where to start.

I figured I would go for something simple... something easy to make Marsy and Steampunky. How about the  Transformation wand? With several variations of that throughout the series, it shouldn't be too difficult to make one that at least resembles on of them. My personal favourite was the star version. I just think the star that repeats on Sailor Mars' outfit is great, and having several stars on it already, this seemed like a natural choice.


I trolled the aisles of my local craft and sewing stores for the pieces I would use. With Christmas coming up, I was able to find a felt star that had a nice filigree pattern cut into it. Glue this to a stable layer (a wooden star, in this case), paint it gold, and I have a nice Victorian version of the topper on the star wand.


I found a nice wooden something or other in the woodworking section of Michaels Crafts. I squashed a piece of Fimo (polymer clay that hardens when baked) to fit between the star and the handle.


I painted them as separate pieces, and glued them together when they were dry. I didn't like they way the red and gold Fimo piece stood out, so I painted that gold after I assembled everything. It looked much better once it was painted gold too!


I glued some gears to it, and wrapped a chain around the handle. It looked quite nice when it was done. I will include some better photos in my summary at the end of the project.

Final note on props... in addition to the rules of the convention about weapons and props, remember that you are going to have to carry this thing around ALL DAY! Being a totally non-functional prop, not a purse or something else that was actually useful, I found it annoying to carry this around for 6 hours. And it wasn't even that heavy. I am having second thoughts now about taking this prop to my next convention, and instead I am thinking about making a different accessory that is hands free.

Genre Mash-Up: Steampunk Sailor Mars - Pt 3

Overskirt and Underskirt

The overskirt is from Butterick pattern B3906 - Misses Petite Costume (really descriptive name!). Basically, it was for a generic barmaid/housemaid/peasantwoman outfit. The type of fabric used would determine the theme of the costume. I had made it with a brown pinstriped material with an ivory cotton lace trim and a brown ribbon tie, as seen in the pirate photo in the previous post. For Sailor Mars, I will be swapping out the ivory cotton shift for a red taffeta pleated underskirt. The red taffeta will be the same material used in the sailor collar.
B3906


I didn't bother buying a pattern for the underskirt. I am basically going to make a shorter version of the black skirt I had made for the Victorian Dress I made earlier in June. I gather the top to a waistband, and make lots of pleats which are sewn to the bottom of the skirt.

I did go back and forth with how to do the bottom of the dress. I could do a gathers, or I could do knife pleats. Looking at Sailor Mar's original skirt, I decided to go with the pleats, even though they will take much longer. The Victorian skirt took 6 hours just to do the pleats. But, having done them once before, it went much faster this time! And, I don't think the skirt is as full, so there were fewer pleats to make.

With the pleats stitched to the bottom, I gathered the top and sewed that inside a simple waistband. I am not sure if I will use hooks or ties to close it. I am thinking about using ties, because I may need to adjust the size depending on the corset I might be wearing with it.


It is lacking in volume, and as anyone who has watched any anime knows, their skirts are never limp and lifeless! I don't want to go full out Lolita, but a petticoat will finish this off nicely.

Genre Mash-Up: Steampunk Sailor Mars - Pt 2

A couple of years ago, I made a pirate costume. I had every intention of using most of that costume in a Steampunk outfit. The over skirt and the bodice are the big ones. The pirate hat doesn't really transfer that well!
My stagette was pirate themed, so that is my explanation for the crown on top of my hat!

In my design for Steampunk Sailor Mars, I kept those two items in mind. 

The bodice was a lot of work, and the boning took forever. I used Butterick pattern B4254 - Misses Stays and Corset - View A.
B4254


Each boning channel must be sewn in a specific order, and each bone must be inserted before the next channel is sewn. This is because they go in all sorts of directions, and the next bone will close off the previous channel. I drew on the lining side with a marker each stitch line, traced from the pattern. Following the instructions, I wrote the number on each channel, so I would know which ones to sew first. After each channel, I inserted the bone, and moved on to the next one. Because of the high number of bones, and the fact that this was a costume piece, I used plastic boning from the fabric store. Each bone is sandwiched between the fashion layer and lining. There are two layers of material in the corset. The edges are finished with bias binding, hand stitched all the way around. The grommets are two piece, hand set. The lacing is 1/2" ribbon.

Because the original stays took so long, and involved so much boning, my plan was to make "covers" to wear over the original when I wanted to change the colour. This meant that I could sew the basic stays, put a few key pieces of boning in place (the very front and next to the laces) and wear it over top of the original piece. The structure and shape would be created by the original heavily boned garment, and the top layer would simply be for fashion. Lots of layers, yes, but much easier to make! This is exactly what I have done for Sailor Mars.


During design stage, I decided that I didn't want to tabs on the bottom of the bodice.  I removed the tabs from the bottom, smoothing out the bottom line. The whole thing is hand stitched with ivory bias tape, and then ivory lace is sewn to the bottom edge. I had lots of ivory lace left from the original pirate skirt, so I used the same lace to edge the bottom of the bodice, tying the whole look together.

When raiding my grommet stash, I discovered that I had no gold coloured grommets. A trip to the notions section of my local Fabricland left me disappointed... in a last desperate attempt, I looked through their clearance section, and found these adorable brassy star grommets!! They did not come with a setting tool, and I was unsure if my various tools at home would do the job. I resigned myself to trying these with my last resort being to use the silver grommets I had in my stash at home. Lucky for me, these worked just fine in the setting tools I had!


What a perfect little detail! It is highly unlikely that ANYONE is going to notice these, but by golly, I know they are there, and I just L-O-V-E that they fit the theme and character so well!